1. Create a directory to store all the files required for the mods. I’m creating a folder called c:\mods\.
2. Copy the character file which you wish to mod into the folder created above. The character file I’m going to be working on is Scorpions first costume and is called “CHAR_SCORPION.XXX”.
3. Copy Gildor’s tools i.e. decompress.exe and extract.exe into the mods folder.
4. Start up a command prompt. You can do this by typing “cmd” into your win 7 search box or in the run command on Windows XP. If you are running Windows 7, right click on the cmd program and select “Run as Administrator”.
5. Type in the following command to navigate to your mods directory: “cd c:\mods”
6. Now we need to decompress the xxx file. Type “decompress CHAR_SCORPION.XXX”. The capitalization is important as the game files are case sensitive.
This will create a folder called “unpacked” with a decompressed version of the file in it.
Navigate to the unpacked folder and copy the uncompressed file into your mods directory. This will overwrite the original xxx file.
You can delete the unpacked folder if you wish, as you don’t need it anymore. I like to keep it so that you have a backup of the original file you are working with.
7. Now we need to extract all the files from the xxx character file. In your command prompt Type “extract CHAR_SCORPION.XXX”
This will extract all the files contained within the xx file into a directory called “char_scorpion”. We need the texture2d files from here. Navigate into the char_scorpion directory. In this directory, there will be a directory called textures, navigate into this directory.
The textures directory contains all the textures we are going to be working with in texture2d format (in my example there are 21 files). Select all the files and select edit-copy.
8. Go back into your mods folder and paste all the texture files here. Also create a new directory called “backup” and paste all the texture files in the backup folder as well.
9. Now that we have all the file ready, we can begin working on modifying the textures.
Before we get to it I just want to quickly explain how X-Packer injects files into the character xxx file. Firstly it opens the character xxx and then it opens the texture2d file. It then searches the character xxx file for the texture2d file. If you have made any changes to the texure 2d file, it won’t find it, therefore it is always important to take a backup.
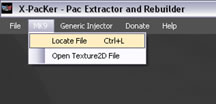
10. Open X-Packer and select Mk9 – Locate file. (Xbox users, make sure you select the option under the Xbox submenu).
You will be asked for to open the xxx character file first, in our example this is the CHAR_SCORPION.XXX file. Secondly it will ask you for the texture file you wish to modify. Usually the _diff file is the file which is used for the main character texture so I in this example I will select “Scorpion_Diff.Texture2D” as the texture file to work with.
The program will then display a grid will all the texture blocks found for the texture2D you have specified.
11. Click export on the first row. You will be asked to specify a filename for the dds file which will be created. I’m going to call the file “diff.dds”.
12. You can now edit the dds file in whichever application you choose. Remember to save the file as a dxt5 dds file with mip maps. The best way to check if you have saved the file in the correct format is to check the filesize before and after the edit.
13. When you are done editing the file, select import on the first row and select the edited dds file you have worked with.
The texture file is now injected into the character xxx file.
14. If you have made changes to any of non dlc characters, you need to edit the filesize in the ps3toc.txt file. Scroll to right of the grid in X-Packer and see a field called “TOCSize”. Click on this and field and press “ctrl+c” to copy the value.
Open the pstoc.txt file and look for the entry for the character file you are modding. In our example this is the char_scorpion.xxx file. Once you locate the entry, the filesize is the value to the extreme left. In this example the value which is currently there is “13762560”. Highlight this value and select edit-paste from the menu. Our new value is “21461007”.
15. You are now done, copy the xxx file and the ps3toc.txt file to your ps3 and enjoy the game.
16. This is an optional step. If you plan on modding the xxx file again, you will need to have a texture2d file containing the modified dds file in order to use the locate file function again.
In X-packer select open “Texture2d” file and open the Texture2d which you wish to modified in the xxx file in our example, we modified the “Scorpion_Diff.Texture2D” file so I’ll open that. (Xbox users, make sure you select the option under the Xbox submenu).
Click import from the first row and then select the dds file which you worked on previously. In our example this is the diff.dds file. The program will then create a modified texture2d file for you. You will use this file in future when selecting the mk9 –locate file function.