Saturday, November 27, 2010

Scott Hall Caw - SVR2011

05/12/2010

Attire preview:


Sunday, October 31, 2010

Hulk Hogan caw - SVR 2011


If you find this post/tutorial/mod useful, please click one of the ads on this site


With textures:

20/11/2010

All four attires finalised (click on pic for full size)


(Updated 16/11/2010)

----------------------------------------------------------------------------------------------------
 Without textures


Saturday, October 30, 2010

Goldberg Caw - SVR 2011

If you find this post/tutorial/mod useful, please click one of the ads on this site.

Hey guys, just to clarify this has been uploaded to live some time ago.


04/12/2010

All four attires compeleted (click for full size). Will be uploaded to live soon:


27/11/2010

A few more updates and an alternate atttire (click on pics for original size):


Updates with textures:


Highlight reel messes the colours up a bit. The beard is actaully a bit darker in game same goes for the eye colour:


Yesterday's pics, made a few minor tweaks to the face since then.

Caw mode:


Friday, September 10, 2010

Tutorial on How to Edit Textures for the Smackdown 2010 on the 360


The textures for the Smackdown models have a unique format. There are different textures which are applied to a single model which have different functions i.e

-       A color texture which is the skin, clothing and other detail
-       A normal map which gives the model an illusion of depth and controls how the lighting is reflected of the model. E.g. with facial hair the surface of the model looks rough instead of smooth
-       A texture called AO which controls how the shadows are rendered on the model. In most cases it is not necessary to edit this file.

All of these textures have an alpha channel. You only need to edit the alpha channel of the color texture as this alpha channel controls the sweat and wether certain parts of the models is displayed or not e.g which parts of the models hair is rendered.

There are many methods to edit the color texture but I am going to describe the method which I use.

a) Creating your color dds file

Firstly you need to download a program called Dxtbmp. This program allows you to edit the alpha channel and the texture individually in any editor of you choice. The first thing you need to do when you start the program is select the editor of your choosing. I use paint.net because it is free and saves the images in the correct format. 


Once you have configured dxtbmp, open your dds file in it. It will display the texture and the alpha channel. Clcik on “Image -  send to editor” or “Alpha – send Alpha to editor” to work with either of these. Don’t close dxtbmp as you will need to use it again later. 


When working with the alpha channel, you will notice that the hair has a format which determines what parts of the hair texture will display. The parts of the hair on the alpha channel which are white will display and the parts which are black will be transparent. You can make models bald in this manner.

When you are done editing the files in your image editor, save it in the default format which is bmp. In paint.net you are given the option of selecting the color depth of the bmp file. With the texture, select “Auto-Detect” with the alpha you may need to select “auto detect” or 8 bit. In most cases Auto-detect will work for the alpha channel will work but in a few instances, dxtbmp will not save the updated alpha channel if it is not 8 bit. 


Go back to dxtbmp and select  “Image -  reload after edit” and “alpha-refresh alpha” to reload the edited files. Finally save the dds file by selecting “file-save as” and ensuring that you save as dds dxt5 format. 

b) Creating your normal dds file

Luckily in paint.net there are plugins which create the normal maps for you. You will need to search for and download the normal map plugin for paint.net separately though.

To create a normal map of your texture, you need to first create a black and white version of your new edited color texture (the texture with the skin, details and not the alpha channel). 


Get the color texture into your image editor using dxtbmp as described in the first part, in my case I use paint.net. Click on “Image – Black and white” in paint.net and then “Effects – color – normal map”. You will be presented with x.y.z coordinates for creating the normal map, adjust these whichever way you like.

The final texture will need to be resized as the color texture is usually 2048x1024 and the normal texture is usually 1024x1024.

You will need to paste the new normal map over the old one. Use the method described in the first part to do this.

Friday, August 6, 2010

How to add additional attires using X-Packer

Thanks to Brienj, becks and Andy for providing some of the info contained in this tutorial.


Remember to take a backup of all your files before attempting this.


EDIT: Here's a dummy pac file with has 12 Attires already loaded. Just inject your PACH files into it: http://netload.in/dateiUhm8mtC4gT/dummy_wrestler_wwe2k14.rar.htm

1. Firstly you need to find a PAC file which has the correct number of attires or more attires than you require. It can be any Pac file. I usually like to use the Edge Pac file because it has lot of alternate and entrance attires.  Or you can use the dummy pac posted above.


2. Prepare all the PACH files you wish to insert. Open your PAC file (in this case I am using Edge’s Pac so it’s 110.pac).


3. Inject all the PACH files you wish to overwrite. I am going to be creating and entrance attire for nWo. Hogan so I want to insert two PACH files, one for his entrance and in ring. I am going to overwrite the 0011002 and 0011004 PACH files in the Edge archive. Even though there are four PACH files, there is no need to overwrite all as we are only going to use two.


4. Now you need to rename the PACH files to match the model Id you are going to replace. Since we are going to be adding attires to Hollywood Hogan which has an ID of 121, the ID’s of your PACH files will start with 000121**. The remaining two numbers will depend on what type of model it is. 02 Is the ring model for the first attire and 04 is then entrance model. 12, 14, 22, 24, 32, 34 are the id’s for the second third and fourth attires.


5. Since I am replacing the entrance and ring models for the first attire, I rename 00011002 to 00012102 and 00011004 to 00012104. Even though we are not using the other PACH files in the archive, I rename these to 00012112 and 00012122. This is done so that the application doesn’t overwrite Edge’s values in the arc file when we are updating later. Don’t close X-Packer you will need it to update the arc file later.  If you are using the dummy PAC I posted, there is no need to rename the PACH files you are not using as X-Packer will not find 000DUM** in the arc file.


6. Remember to rename the actual pac file to the name of the pac you are going to replace. In this case Edge’s file is called 110.pac. This is renamed to 121.pac so as to replace Hogan’s pac.

7. Now you need to edit the misc.pac file to get the game to load the additional attires. Follow this tutorial on editing the Misc.pac file in X-Packer : Click here

Thursday, July 1, 2010

How to work with Xbox 360 PAC files using X-PacKer

Firstly you need to understand the way in which the XBOX Pac files are structured. The file contains many other archives and is structured in a hierarchical manner as follows:

PAC FILE (Which I refer to as “Main Pac”)
|---- PACH File
|--------- Model Files
|--------- Texture Archives
|------------------Textures

The texture archives and model files are bpe compressed and will need to be uncompressed if you would like to make changes to them. The texture archives are usually named with a “0” followed by a letter eg. 0A, 0B, etc.

Here are the steps you need to follow:

1. Open the Main PAC file by selecting Open – Xbox 360 Main Pac.
2. Once you have opened main pac, the program will display all the PACH files contained in the archive.
3. Note down the data contained in the “File Name” and the “size” columns. You will need these later. In my example the file name is 00013202 and the size is 458300.


4. Click “Extract” on the row of the PACH file you wish to extract.
5. The app will extract the PACH file. Open the PACH file which you have extracted by selecting Open – 360 PACH archive.
6. The app will list the contents of your PACH archive. Select uncompress for the file which you wish to work with. In this case the textures are contained in the 0A file so I will uncompress this file. The app will create two files, X-Packer extracts the file as is (0A.bpe) and also cerates an uncompressed version of the file which is 0A.pac.
7. On the row which lists the 0A.bpe file, select inject and choose the 0A.pac file.
8. X-PacKer will inject the uncompressed file into the PACH archive. If you have done this correctly, the extension field of 0A will change from bpe to a symbol.
9. Now that you have uncompressed the data in the PACH file, you can extract and inject the textures into the 0A archive. Double click on the FileName field of the archive you want to work with, in this case 0A. This will list the contents of 0A in a second grid.
10. Extract which ever dds files you wish to work with from the second grid and reinject when you are done.


11. Finally when you are done working with the PACH file, open the main pac file again and inject the PACH file you edited earlier.
12. Make a note of the new size of the PACH file, in this example it is 588000.


You are done editing the PAC file but for the new PAC to work in game, you need to change the size value in your arc files. The arch file lists the name of every PACH file and it’s size. If the wrong size is indicated, the game will freeze.


Here are the steps to change the size value in your arc file (I might automate this in the next release).

1. Open you arc files in a hex editor. The xbox version has two different arc files and you need to make the changes in both the arc files.
2. Search for the name of your PACH file i.e. in this case it was 00013202
3. A few bytes after the name of your PACH file, the size of the file divded by 100 is listed. In this example the original size of the PACH file was 458300. Therefore the value (458300/100 = 4583) is listed.
4. The size value must be updated to the new size of the PACH file. In this example the new size of the PACH file was 588000. Therefore the old value should be replaced with 5880 i.e. (588000/100 = 5880).
5. Remember to do this in both arc files.
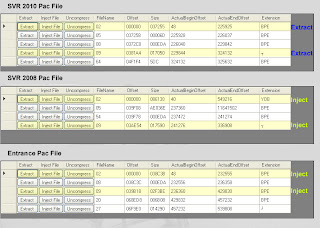
Tuesday, June 29, 2010

SVR2010 How to take Hi-Res Screenshots and use PTExplorer with a Flash Drive

As many of you know, the latest xbox dash update allows you to save games on a usb flash/pen drive. By saving on a usb drive instead of the hardrive, you can access your paint tool file without using xsata or any other complicated method. Here's how:

1. Download a programme called usb xtaf (google it). This programme allows you to explore the contents of your flash drive.
2. Plug you flash drive with your saves into you pc and the start up xtaf.
3. Select "file -open drive". This should give you a list of all the saves on your drive.
4. Browse to the folder where the svr2010 save is (mine is called 54510844) and look for your 00painttool.pt file.
5. Right click the file and select extract. Save it where you please. dont close xtaf, you will use again below.


Now that you have your Paint tool fle on your hdd, you edit it with pt explorer in the normal way i.e. inject graphics, resign & rehash with modio when you are done.

6. Now that you have finished working with your paint tool file, go back to xtaf and delete the paint tool file on the flash disc. Right click in the same directory location in xtaf as the old file and select "inject". Browse for your new paint tool file and inject it.

Thats it, the file should now work in game.


PART 2 - Taking hi Res screen shots

1. Make sure that your game is saving on your flash drive at the title screen. Go into the highlight reel editor and Take a screenshot. Save the screenshot into a slot in the game.
2. Plug your flash drive into your pc and browse to directory of the save using the method described in part 1.
3. You screenshot should be titled **Screenshot.ss. Extract this file to you hardrive.
4. This file contains you screen shot in dds format and a few other files.
5. To extract the screenshot, download a programme called dragon unpacker.
6. Start up dragon unpacker and use the built in app called hyper ripper to scan the file.
7. The scan should find one dds file which can be extracted or exported.


Here is a screenshot extracted in this manner.


I hope that this information has been useful. Please don't ask me questions on how to use ptexplorer, xtaf or dragon unpacker, those aren't my apps.

Wednesday, June 23, 2010

X-Packer Tutorials

Texture Editing Video Tutorial by ArjunTheMan:


Futher infomation on the above can be found here:
http://caws.ws/forum/topic/391320-smackdown-vs-raw-texture-editing-tutorial/

How to edit Svr 2010 and import Older Models into the game using Xpacker

Some older models have files in the pac archive which cause the model not to load. With svr 2010 models, there is a file called 64.bpe which contains the padding at the end of the file compressed into a bpe archive. Sym, hctp and svr05 contain some graphic files which the game cannot read.

In order to get these files to load do the following:

1. Open up the pac file which contains the model and textures you want in X-PacKer.
2. Extract the 02 (texture file) and the 09 (model file).
3. Open a pac file which works with editing i.e. a Pac file from svr06/07/08.
4. Inject the 02 and 09 files into the new pac file you have opened.
5. Import the model into the game.

Things to note about older model files:
- HCTP models don’t display correctly due to issues with the models
- SYM models don’t display correctly due to issues with the models and different alpha values on the textures
- Svr 05 models don’t load in ring but load on entrances due to the large filesize of the textures.


How to add entrance gear to a model using Xpacker

I am going to use an example to illustrate this. Say you want to add Stone Cold's entrance jacket to the Rock.

1. Open the Rock’s pac file.
2. Extract the 02 and 09 files from the archive.
3. Open Stone Cold’s entrance model. If you have opened up the correct model, you should find that there are more than four files. The fifth and sixth files are usually called 20 and 27.
4. Inject the Rocks 02 and 09 files into the Stone cold entrance model you have opened, replacing the 02 and 09 files in the Stone Cold Pac archive.
5. Import the modified Stone Cold entrance model into the game.

You can also extract the 20 and 27 files if you want to make texture edits the entrance gear. 20 is the model file for the entrance gear and 27 is texture for the model.


Help Pics